Hacking the Winkhub
How I liberated my Winkhub from the Cloud
TL;DR; I rooted my Winkhub over the UART connection and then wrote a small Go web service to allow me to turn my lights on and off from my phone.
Recently I became interested in controlling my lights automatically. I wanted to implement a timer that could flip the lights on and off during certain hours of the day, and to create a snooze button that disables the lights from shutting off when I still needed them on after the shut-off hour. I’m currently using one of those cheap hardware outlet timers.
I came across the Winkhub while browsing the light section in HomeDepot. I did a quick search to see which of these “Smart” devices could easily be rooted because I did not want the controls routed through a third party service. I also thought this would be a fun challenge to try hacking on some hardware. Sadly, the PHP hack I had read about was no longer in the firmware of the Winkhub I purchased. That led me to a crash course in hacking this thing with the UART connection and learning how to cross compile Go so I could run my own programs on the device.
I’ve listed all the resources I used at the bottom.
Shopping list
- Winkhub I picked mine up at a HomeDepot and paid $50. I should have bought it online since they have a deal that combines 2 light bulbs and a hub for the same price.
- GE Link Light bulb At least one light to test with
- FT232RL FTDI USB to TTL Serial Adapter This adapter has a jumper to to switch between 3.3v and 5v. The Winkhub uses 3.3v
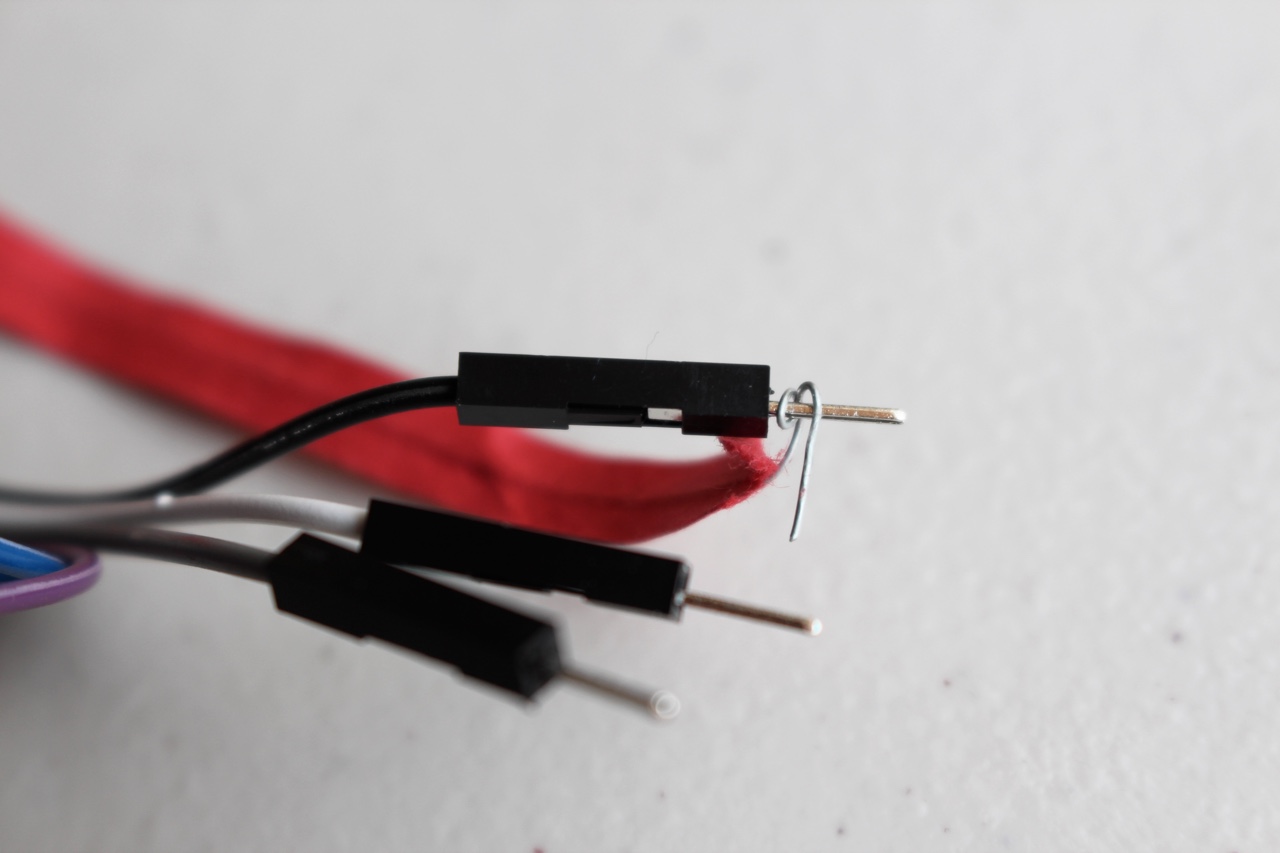
- Female and Male Wiring Harnesses I bought this mainly because I needed the wires. I’m not sure how to safely use that USB to Serial TTL adapter with the jumper.
- Twist tie or a short wire I just used one I found in the kitchen off some groceries
- Some LEGO bricks to build a stand for convenience
- Hex torx screwdriver
- Multimeter optional
- Linux (Mac & Windows should work too)
I should note that some of the stuff I am doing with the wires is probably questionable.
Do this at your own risk!
I haven’t really done any hardware hacking in the past like this, and hardly know what I am doing. I figured this out by watching a bunch of youtube videos and reading some blog posts on how to use a multimeter and basic usage of a UART connector.
Device Teardown
I did not connect my hub to the wireless router before doing any of these steps in fear of the firmware updating to block me out.
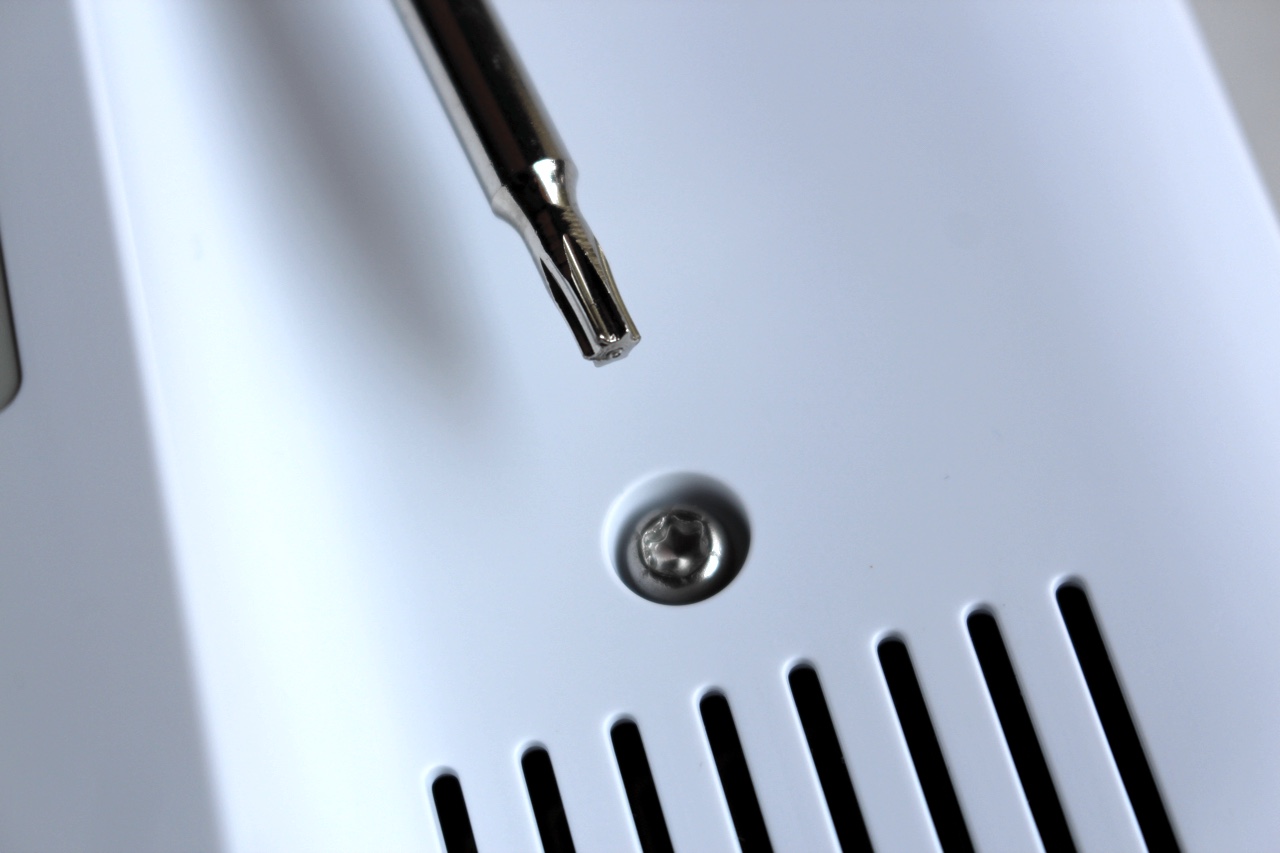
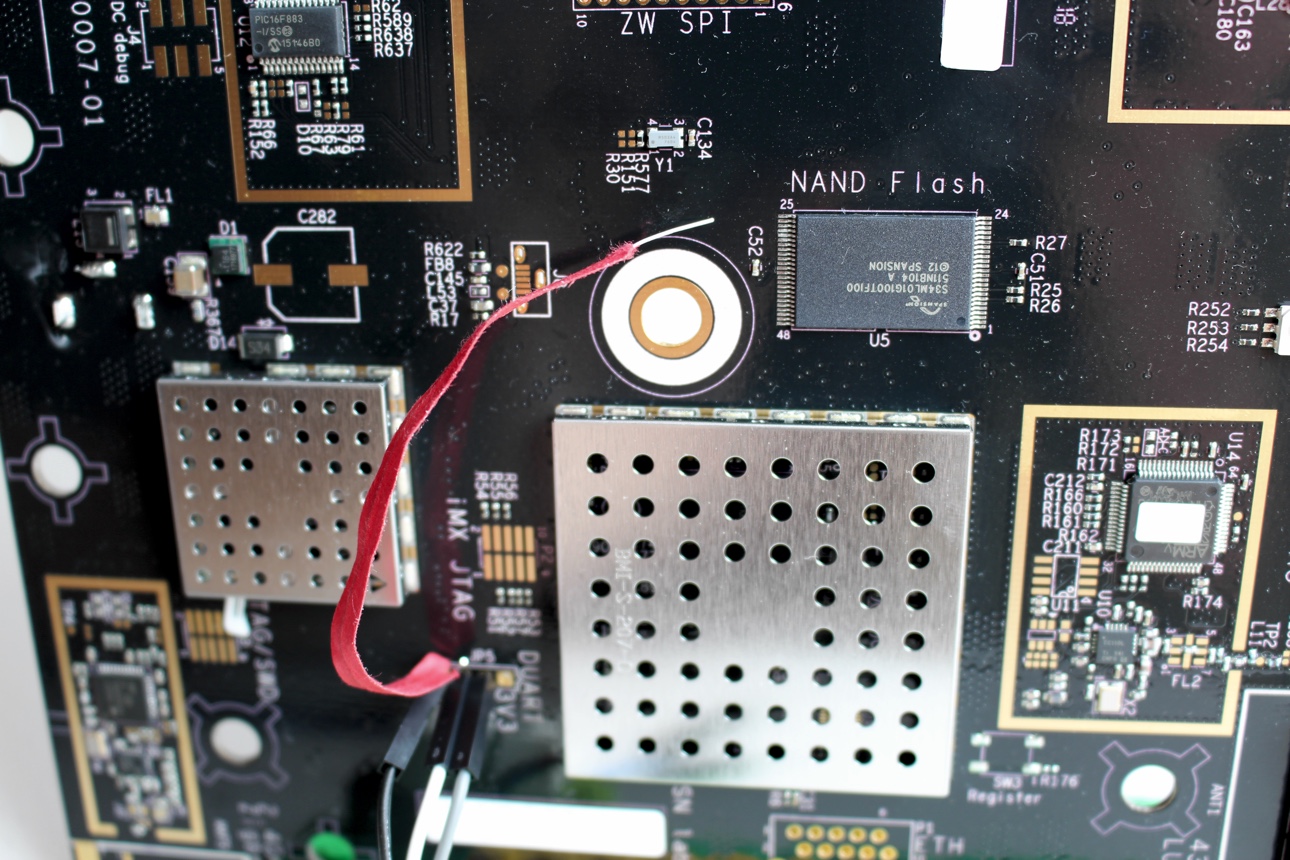
Fresh out of the box open the Winkhub by removing the 4 screws on the back with a Hex torx screwdriver.

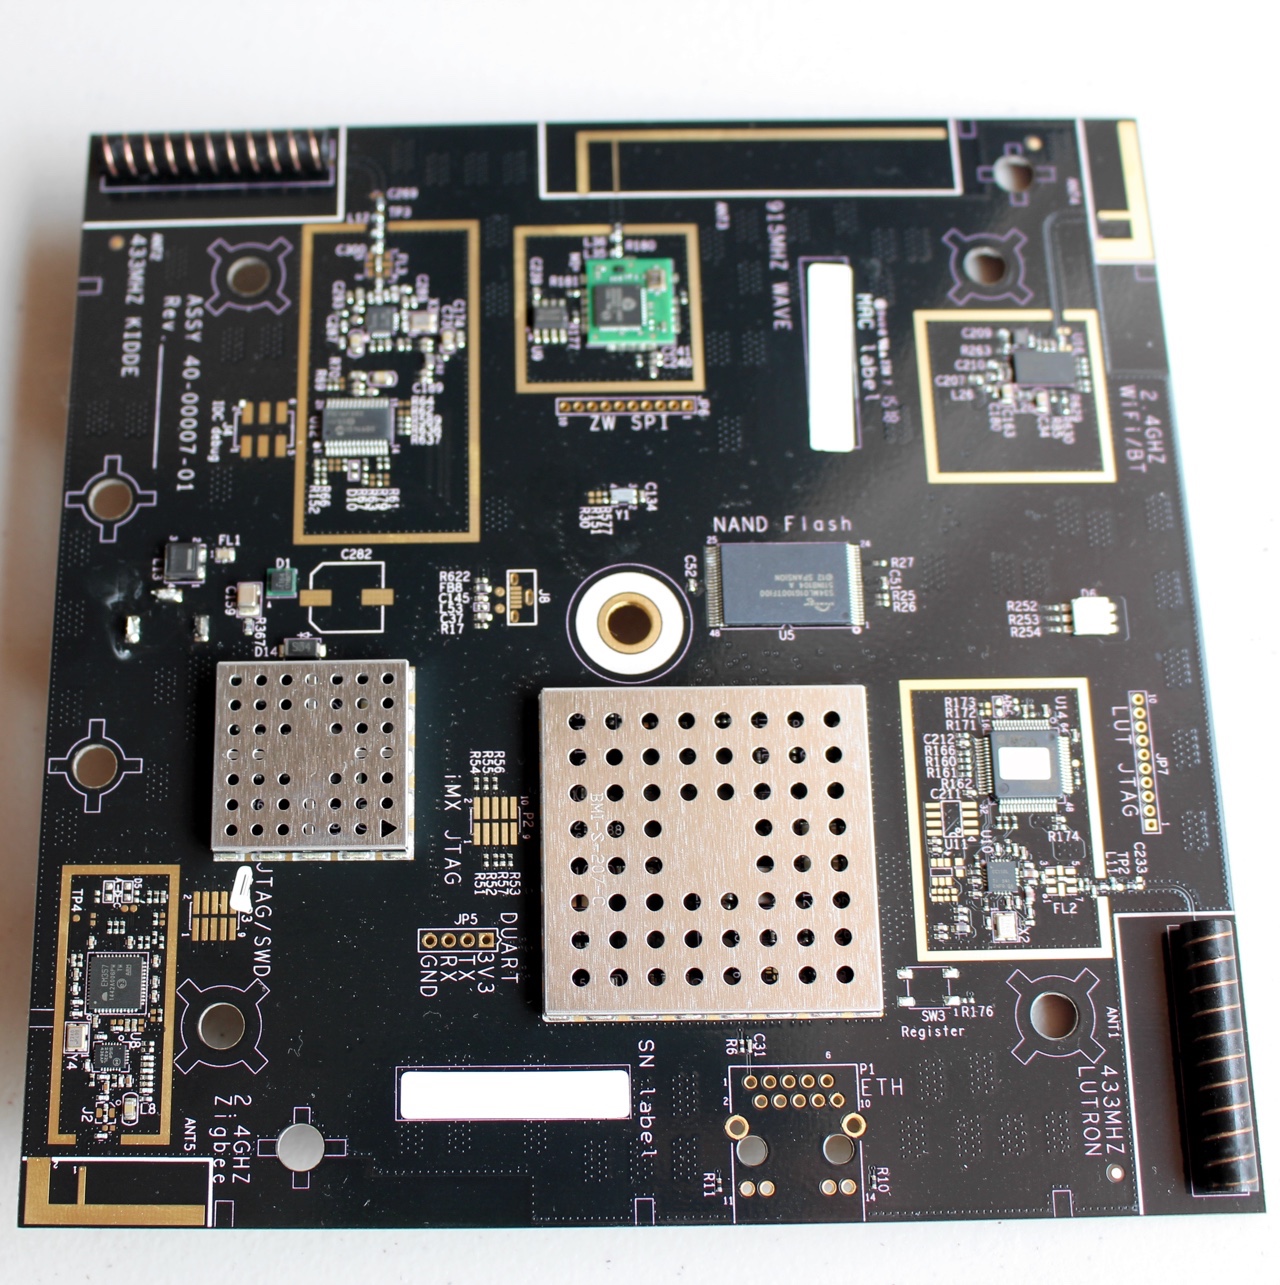
Pull the circuit board out and mount it on a stand. I used one made out of LEGO bricks.

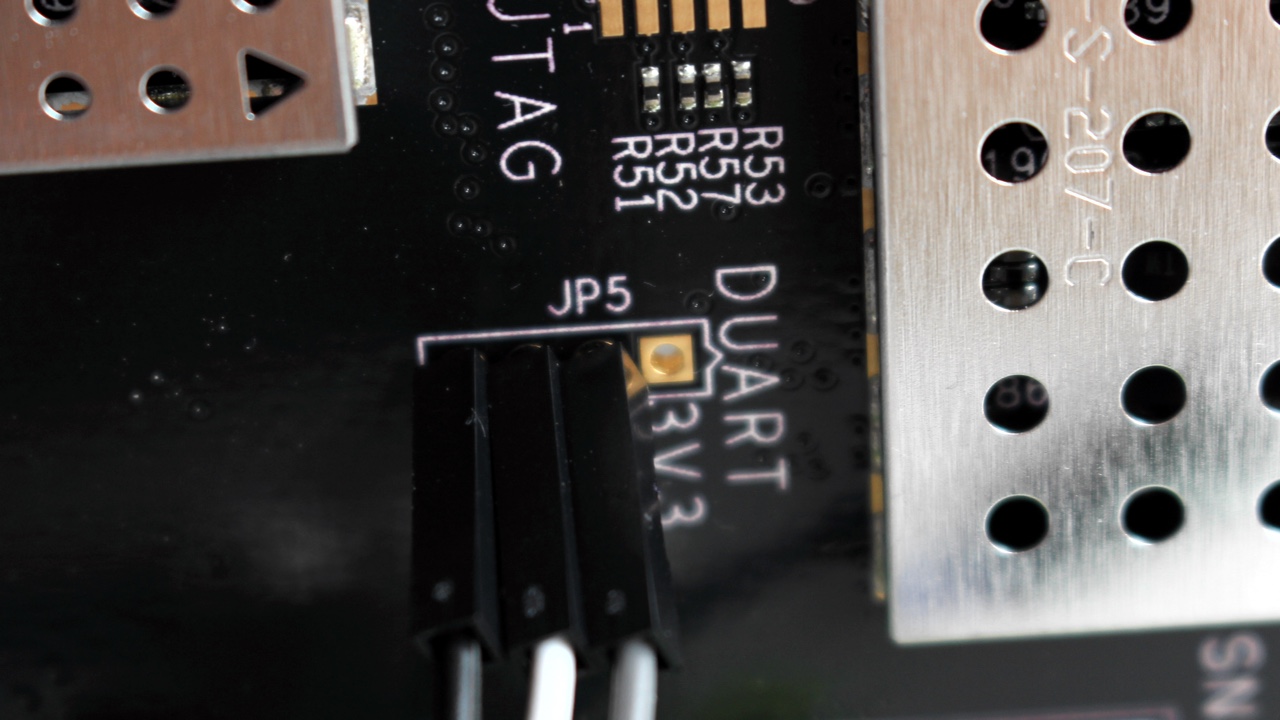
Place jumper on the 3.3v and center pin
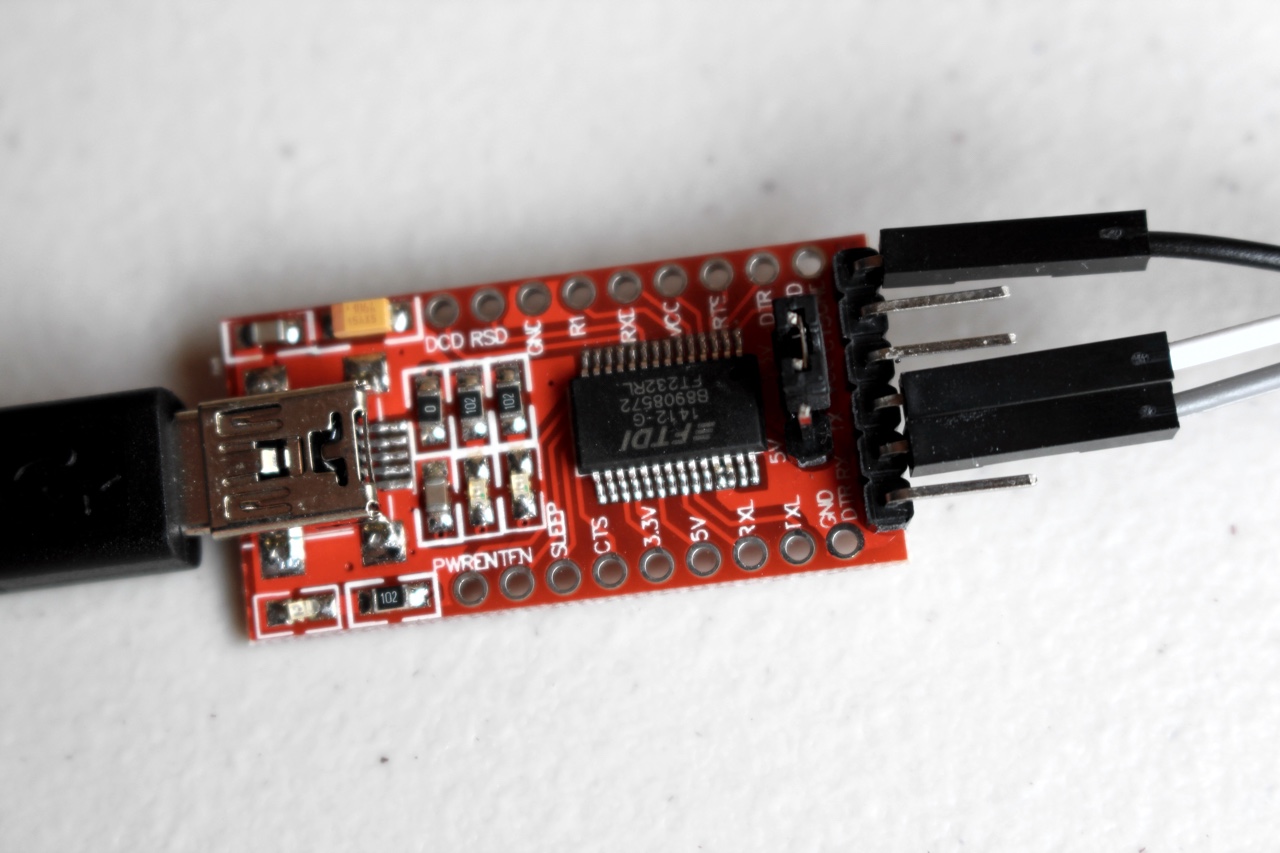
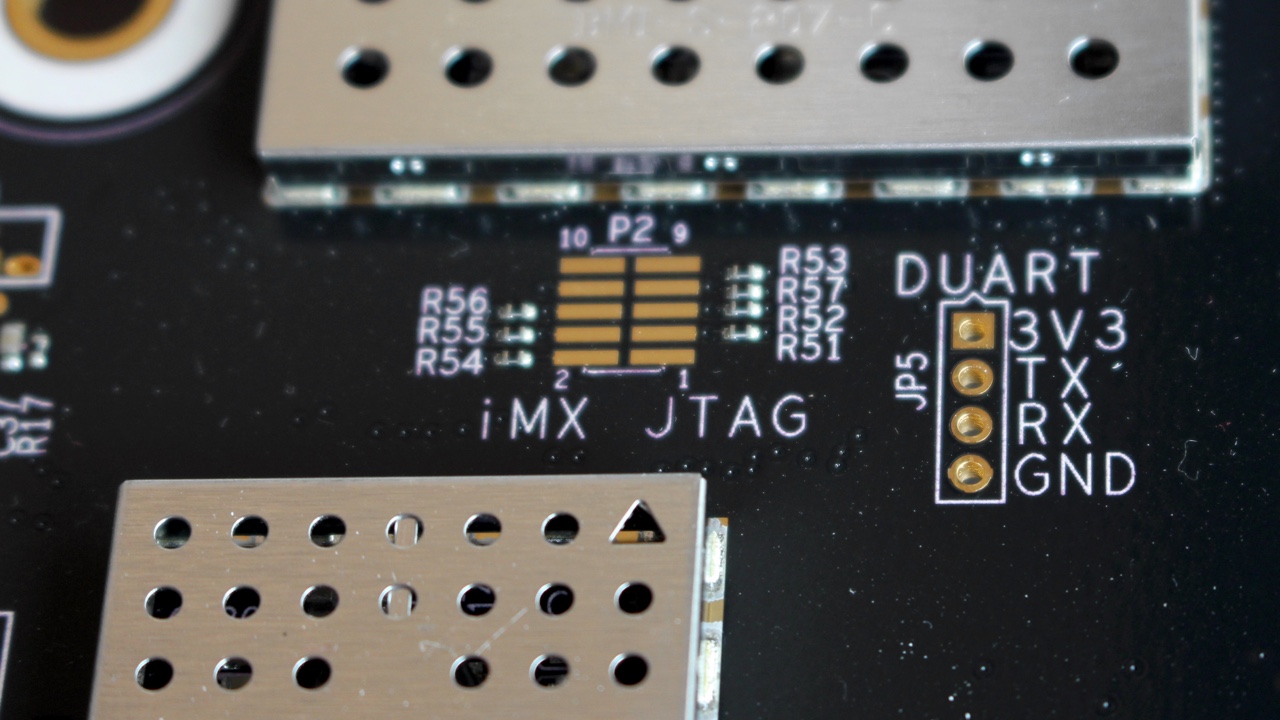
At this point the Winkhub should still not be plugged into power. Attach wires to the GND (Ground), TX (Transmit), & (RX) Receive. Note that you will want to on UART side connect the TX to the RX connection and the RX to the TX connection. The ground connects to ground in both and the power is left empty.
Place the wires into the UART connection on the hub.
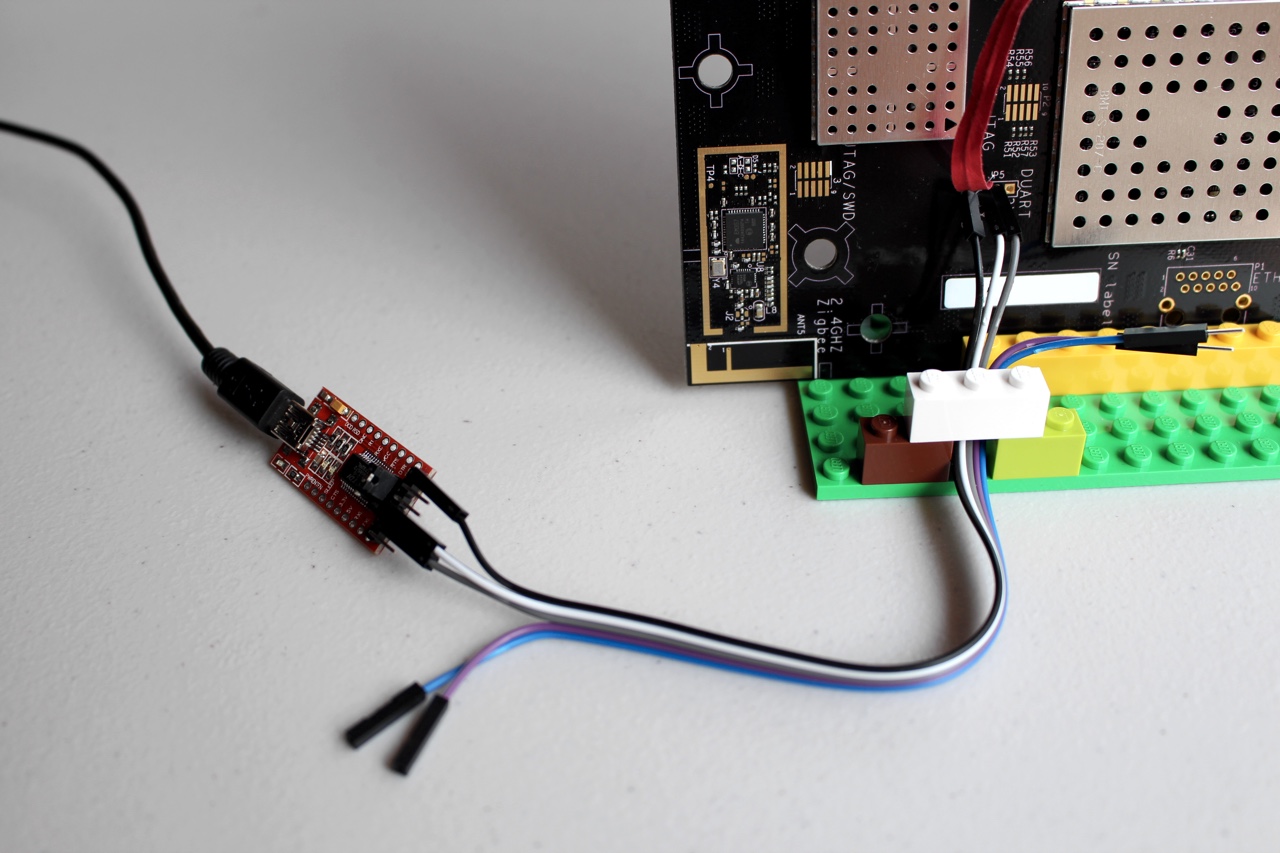
I held my wires into place with the help of some LEGO bricks. I’ve seen other people solder on adapters. I found no issues with plugging my wires in without soldering them.
Plug-in the USB cable for the serial adapter if it isn’t already.
Things I wish I knew ahead of time:
- minicom can record logs to a file
reboot -fis how you reboot the Winkhub. Nothing seems to happen without the-fflag- The Winkhub does not seem to like spaces in the wifi passwords
- Running
pinginside minicom will disable reading any input and I can only get out of it by rebooting the Winkhub. I’m sure there must be some better way to kill it.
Setup the serial connection
I used minicom to communicate with the serial adapter.
Raspbian: sudo apt-get install minicom
OSX: brew install minicom
$ minicom -s
- Go to Serial port setup
- Press A to update the serial device to
/dev/ttyUSB0(I did this from a Raspberry Pi so it may be different on another machine.) - Set Hardware Flow Control to
No - Press enter to save the settings
NOTE: Minicom can be configured to capture logs to a file using
ctrl + A, Zthen pressL
    +-----------------------------------------------------------------------+
    | A -    Serial Device      : /dev/ttyUSB0                              |
    | B - Lockfile Location     : /var/lock                                 |
    | C -   Callin Program      :                                           |
    | D -  Callout Program      :                                           |
    | E -    Bps/Par/Bits       : 115200 8N1                                |
    | F - Hardware Flow Control : No                                        |
    | G - Software Flow Control : No                                        |
    |                                                                       |
    |    Change which setting?                                              |
    +-----------------------------------------------------------------------+
- Save setup as default
- Exit
You should see a screen like this:
Welcome to minicom 2.6.1

OPTIONS: I18n
Compiled on Apr 28 2012, 19:24:31.
Port /dev/ttyUSB0

Press CTRL-A Z for help on special keys
Power up
Open Dissolved Girl in the background for this next part.
At this point you should be able to plug the Winkhub into the wall. I used a surge protector so I could easily turn the Winkhub on and off. This is very useful later when it comes time to short the pin.
This is the output I recorded after powering mine on the first time:
Note: The CPU at the top is a Freescale i.MX28 at 454MHz. I used this information later to find out that it is possible to compile Go for this platform. (ARMv5)
LLC

U-Boot 2014.01-14400-gda781c6-dirty (Apr 30 2014 - 22:35:38)

CPU:   Freescale i.MX28 rev1.2 at 454 MHz
BOOT:  NAND, 3V3
DRAM:  64 MiB
NAND:  128 MiB
In:    serial
Out:   serial
Err:   serial
Net:   FEC0 [PRIME]
Hit any key to stop autoboot:  0
UBI: attaching mtd1 to ubi0
UBI: physical eraseblock size:   131072 bytes (128 KiB)
UBI: logical eraseblock size:    126976 bytes
UBI: smallest flash I/O unit:    2048
UBI: VID header offset:          2048 (aligned 2048)
UBI: data offset:                4096
UBI: attached mtd1 to ubi0
UBI: MTD device name:            "mtd=3"
UBI: MTD device size:            8 MiB
UBI: number of good PEBs:        64
UBI: number of bad PEBs:         0
UBI: max. allowed volumes:       128
UBI: wear-leveling threshold:    4096
UBI: number of internal volumes: 1
UBI: number of user volumes:     1
UBI: available PEBs:             6
UBI: total number of reserved PEBs: 58
UBI: number of PEBs reserved for bad PEB handling: 2
UBI: max/mean erase counter: 2/1
UBIFS: recovery needed
UBIFS: recovery deferred
UBIFS: mounted UBI device 0, volume 0, name "database"
UBIFS: mounted read-only
UBIFS: file system size:   5459968 bytes (5332 KiB, 5 MiB, 43 LEBs)
UBIFS: journal size:       1015809 bytes (992 KiB, 0 MiB, 6 LEBs)
UBIFS: media format:       w4/r0 (latest is w4/r0)
UBIFS: default compressor: LZO
UBIFS: reserved for root:  269835 bytes (263 KiB)
Loading file 'DO_UPDATE' to addr 0x42000000 with size 1 (0x00000001)...
Done
Total of 1 word(s) were the same

NAND read: device 0 offset 0x2b00000, size 0x400000
 4194304 bytes read: OK
## Booting kernel from Legacy Image at 42000000 ...
   Image Name:   Linux-2.6.35.3-flex-dvt
   Created:      2014-04-30   3:15:35 UTC
   Image Type:   ARM Linux Kernel Image (uncompressed)
   Data Size:    1928460 Bytes = 1.8 MiB
   Load Address: 40008000
   Entry Point:  40008000
   Verifying Checksum ... OK
   Loading Kernel Image ... OK

Starting kernel ...

[...] Trimmed

+ pidof udhcpd
+ udhcpd -S /etc/udhcpd.conf
+ hciconfig hci0 up
+ bluetoothd
+ hciconfig hci0 leadv
+ sleep 2
+ touch /tmp/ap_mode
+ exit 0
Starting lighttpd: OK
Starting Zigbee...Starting lutron-core...[ OK ]
Starting aprond...Got Z-Wave version: Z-Wave 3.79
[ZWAVE OK]
i: [1139.1] main() (Main|apron.c:51): APRON Home Automation Gateway version 1.2.0+localhost.localdomain-
Starting Wink...Starting monit...hub[1145]: NOTICE: (hub.c:342) hub-dev started up by User: 0
hub[1145]: INFO: (ConfigHandler.c:98) Reading Config from: /root/config/hub.conf
Starting monit daemon
hub[1145]: INFO: (hub.c:385) Waiting for /database/token
hub[1145]: WARNING: (hub.c:416) No Token Found
hub[1145]: DEBUG: (AuthenticationUtil.c:28) Destroying Oauth
hub[1145]: DEBUG: (AuthenticationUtil.c:36) Done freeing oauth
Setting non-canonical mode
Startup complete.
Power off & connect UART

This is where things become a little questionable. It was late when I did this and I realized that I forgot to order a wire that is needed to short the NAND chip by connecting a pin 29 to the ground. I scrounged through my house and realized I probably had some twistie ties. I wasn’t sure if they would be enough to conduct a signal so I tested it by stripping the paper off of the wire ends and connecting one end of a wire to a battery and the other to a tip on my multi meter. Once I saw that it had continuity, I figured it would work. I wrapped the twisty tie around the edge of the ground pin going into the UART connector on the circuit board and left the other end loose.
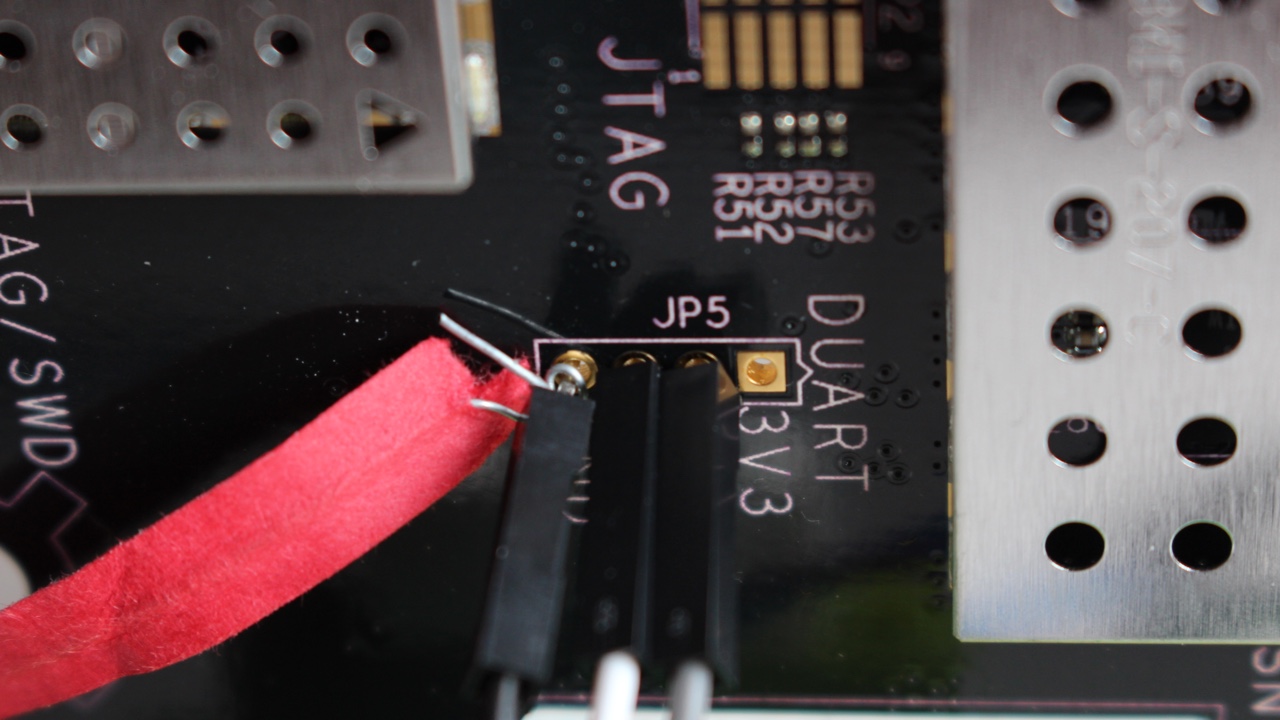
Careful not to touch excess wire to RX & TX pins.
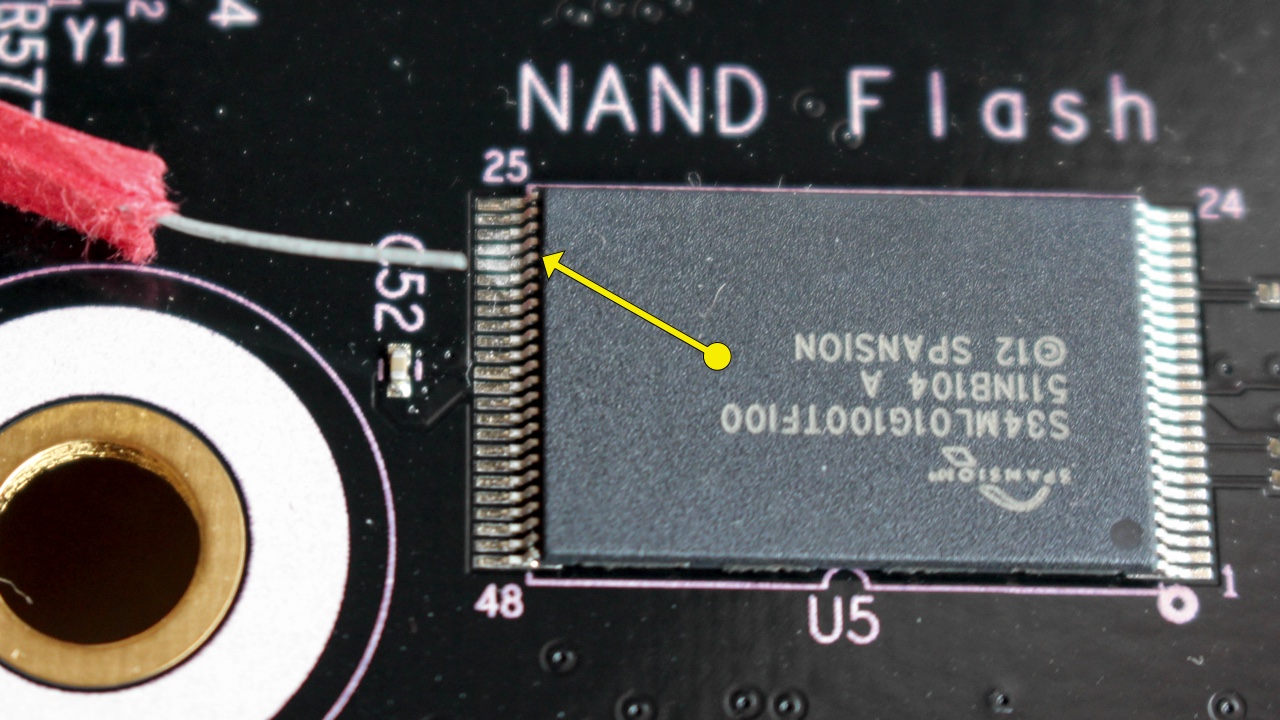
Pin 29 should be connected to ground 1 second after power is turned on.
It took me many failed attempts to figure out that I needed to connect the wire to the ground at about 1 second after turning on the power or as soon as the LED light turns on. I had trouble finding information on how soon to connect the pin to the ground. I’ve listed the bad output at the bottom for reference.
L���BO�� 4194304 bytes read: OK
Wrong Image Format for bootm command
ERROR: can't get kernel image!
Success! At this point you should stop touching pin 29 to the ground.
=> help
?       - alias for 'help'
base    - print or set address offset
bdinfo  - print Board Info structure
boot    - boot default, i.e., run 'bootcmd'
bootd   - boot default, i.e., run 'bootcmd'
bootm   - boot application image from memory
bootp   - boot image via network using BOOTP/TFTP protocol
bootz   - boot Linux zImage image from memory
chpart  - change active partition
clocks  - display clocks
cmp     - memory compare
coninfo - print console devices and information
cp      - memory copy
crc32   - checksum calculation
date    - get/set/reset date & time
dcache  - enable or disable data cache
dhcp    - boot image via network using DHCP/TFTP protocol
echo    - echo args to console
editenv - edit environment variable
env     - environment handling commands
exit    - exit script
false   - do nothing, unsuccessfully
fatinfo - print information about filesystem
fatload - load binary file from a dos filesystem
fatls   - list files in a directory (default /)
fdt     - flattened device tree utility commands
go      - start application at address 'addr'
gpio    - input/set/clear/toggle gpio pins
help    - print command description/usage
icache  - enable or disable instruction cache
iminfo  - print header information for application image
imxtract- extract a part of a multi-image
itest   - return true/false on integer compare
loadb   - load binary file over serial line (kermit mode)
loads   - load S-Record file over serial line
loadx   - load binary file over serial line (xmodem mode)
loady   - load binary file over serial line (ymodem mode)
loop    - infinite loop on address range
md      - memory display
mii     - MII utility commands
mm      - memory modify (auto-incrementing address)
mtdparts- define flash/nand partitions
mw      - memory write (fill)
nand    - NAND sub-system
nboot   - boot from NAND device
nfs     - boot image via network using NFS protocol
nm      - memory modify (constant address)
ping    - send ICMP ECHO_REQUEST to network host
printenv- print environment variables
reset   - Perform RESET of the CPU
run     - run commands in an environment variable
saveenv - save environment variables to persistent storage
setenv  - set environment variables
setexpr - set environment variable as the result of eval expression
showvar - print local hushshell variables
sleep   - delay execution for some time
source  - run script from memory
test    - minimal test like /bin/sh
tftpboot- boot image via network using TFTP protocol
true    - do nothing, successfully
ubi     - ubi commands
ubifsload- load file from an UBIFS filesystem
ubifsls - list files in a directory
ubifsmount- mount UBIFS volume
ubifsumount- unmount UBIFS volume
usb     - USB sub-system
usbboot - boot from USB device
version - print monitor, compiler and linker version
Run printenv
=> printenv
app_boot=run appboot_args && nand read ${loadaddr} app-kernel 0x00400000 && bootm ${loadaddr}
app_boot_bad=run updater_args; setenv bootargs ${bootargs} badapp; nand read ${loadaddr} updater-kernel 0x00300000; bootm ${lo}
appboot_args=setenv bootargs 'noinitrd console=ttyAM0,115200 rootfstype=ubifs ubi.mtd=5 root=ubi0:rootfs rw gpmi';
baudrate=115200
bd_addr=XXXXXXXXXXXX
boot_app=run app_boot || run app_boot_bad
boot_getflag=mtdparts default && ubi part database && ubifsmount ubi0:database && mw 42000000 0 8 && ubifsload 42000000 DO_UPDc
boot_logic=mw 42000004 30; if cmp 42000000 42000004 1; then run boot_app; else run boot_updater; fi;
boot_updater=run updater_boot || run updater_boot_bad
bootargs=noinitrd console=ttyAM0,115200 rootfstype=ubifs ubi.mtd=5 root=ubi0:rootfs rw gpmi badupdater
bootcmd=mtdparts default; run boot_getflag || echo Falling back to updater...; run boot_updater
bootdelay=0
bootfile=uImage
ethact=FEC0
ethaddr=XX:XX:XX:XX:XX:XX
ethprime=FEC0
loadaddr=0x42000000
mtddevname=u-boot
mtddevnum=0
mtdids=nand0=gpmi-nand
mtdparts=mtdparts=gpmi-nand:3m(u-boot),4m(updater-kernel),28m(updater-rootfs),8m(database),8m(app-kernel),-(app-rootfs)
partition=nand0,0
serialno=XXXXXXXXXXXXX
stderr=serial
stdin=serial
stdout=serial
updater_args=setenv bootargs 'noinitrd console=ttyAM0,115200 rootfstype=ubifs ubi.mtd=2 root=ubi0:rootfs rw gpmi';
updater_boot=run updater_args && nand read ${loadaddr} updater-kernel 0x00300000 && bootm ${loadaddr}
updater_boot_bad=run appboot_args; setenv bootargs ${bootargs} badupdater; nand read ${loadaddr} app-kernel 0x00400000; bootm }
ver=U-Boot 2014.01-14400-gda781c6-dirty (Apr 30 2014 - 22:35:38)
Update the bootargs so it gives shell access.
=> setenv bootargs 'noinitrd console=ttyAM0,115200 rootfstype=ubifs ubi.mtd=5 root=ubi0:rootfs rw gpmi init=/bin/sh';
Start the boot process.
=> nand read ${loadaddr} app-kernel 0x00400000 && bootm ${loadaddr}
Enjoy the music while you wait for it to boot.
/ # ls
bin               lib               opt               tmp
database          lib32             proc              usr
database_default  linuxrc           root              var
dev               media             run
etc               mfgtests          sbin
home              mnt               sys
This post contains the rest of the steps to retain root access, enable ssh, and enable serial access without having to short the NAND chip. Be very sure to read every detail. For example, some people in that thread had issues because they forgot to run mount -a.
- Part I - Hacking the Winkhub
- Part II - Troubleshooting Winkhub issues
- Part III - Cross compiling Go for Winkhub
Resources
- How to Use a Multimeter
- Winkhub Teardown and Debug
- Winkhub Shell access through UART
- Using Minicom to give commands to a modem
- Rooting ANY firmware level… the hard way
- Howto update to 01.01 (Step #5)
- Exploitee.rs Wiki
Bad Output
If you see this in your logs you connected the wire too late:
Starting Zigbee...Starting lutron-core...[ OK ]
Starting aprond...UBIFS error (pid 1126): ubifs_read_node: bad node type (28 but expected 2)
UBIFS error (pid 1126): ubifs_read_node: bad node at LEB 62:83784
/etc/init.d/S61apron: line 25: zwavetest+˻ali�W���WH��T)�*�Y.minicom-logs-first.txt�ZY�LL&NJ��ubifs_read_node: bad node type (155 but expected )
UBI error: wear_leveling_worker: error 4 while reading VID header from PEB 193
UBIFS error (pid 1138): ubifs_read_node: bad node at LEB 191:72768
UBI error: ubi_io_write: error -5 while writing 2048 bytes to PEB 7:126976, written 0 bytes
UBI error: wear_leveling_worker: error 4 while moving PEB 193 (LEB -1:-2082455728) to PEB 236
              ��RԼ-Y6
UBIFS error (pid 959): ubifs_read_node: bad node type (76 but expected 0)
���Y��or: ubi_thread: ubi_bgt0d: work failed with error code -5
UBI warning: ubi_io_read_vid_hdr: bad magic number at PEB 7: 1c7f79e2 instead of 55424921
UBIFS error (pid 959): ubifs_read_node: bad node at LEB 189:1984
UBIFS error (pid 959): ubifs_iget: failed to read inode 1698, error -22
UBI: run torture test for PEB 26
nand_erase_nand: attempt to erase a bad block at page 0x00004c80
UBI warning: ubi_ro_mode: switch to read-only mode
UBIFS error (pid 959): ubifs_lookup: dead directory entry 'S70wink', error -22
UBIFS warning (pid 959): ubifs_ro_mode: switched to read-only mode, error -22
nand_erase_nand: attempt to erase a bad block at page 0x00004c80
UBIFS error (pid 1052): ubifs_wbuf_write_nolock: cannot write 3529 bytes to LEB 15:122880, error -5
�M���ɹ����B��������J������}ɽ}������ݥэ������������z����j����*�ɽɁj�R��UBIFS error (pid 959): ubifs_read_node: bad node t     )
nand_erase_nand: attempt to erase a bad block at page 0x00004c80
UBI error: do_sync_erase: cannot erase PEB 26, error -5
UBIFS error (pid 1052): do_writepage: cannot write page 0 of inode 168, error -5
UBIFS error (pid 959): ubifs_read_node: bad node at LEB 188:120952
UBIFS error (pid 959): ubifs_iget: failed to read inode 1687, error -22
UBI error: erase_worker: failed to erase PEB 26, error -5
UBIFS error (pid 1052): make_reservation: cannot reserve 160 bytes in jhead 1, error -30
UBIFS error (pid 1052): ubifs_write_inode: can't write inode 169, error -30
UBIFS error (pid 959): ubifs_lookup: dead directory entry 'S80monit', error -22
UBI: reserve more 1 PEBs
UBI: mark PEB 26 as bad
UBI error: ubi_io_mark_bad: read-only mode
UBIFS error (pid 1052): make_reservation: cannot reserve 160 bytes in jhead 1, error -30
UBI error: do_work: work failed with error code -30
UBI error: ubi_thread: ubi_bgt1d: work failed with error code -30
�GS error (pid 1052): ubifs_write_inode: can't write inode 170, error -30
UBIFS error (pid 959): ubifs_read_node: bad node type (91 but expected 2)
UBIFS error (pid 959): ubifs_read_node: bad node at LEB 169:41648
UBIFS error (pid 1052): make_reservation: cannot reserve 160 bytes in jhead 1, error -30
��.minicom-logs-first.txt�ZY�L�M�J��ubifs_write_inode: can't write inode 167, error -30
UBIFS error (pid 959): ubifs_read_node: bad node type (0 but expected 9)
UBIFS error (pid 959): ubifs_read_node: bad node at LEB 191:125184
/etc/init.d/rcS: line 29: devmem: Invalid argument
UBIFS error (pid 1052): make_reservation: cannot reserve 3645 bytes in jhead 2, error -30
UBIFS error (pid 1052): do_writepage: cannot write page 1 of inode 168, error -30
UBIFS error (pid 1052): make_reservation: cannot reserve 3174 bytes in jhead 2, error -30
UBIFS error (pid 1052): do_writepage: cannot write page 1 of inode 169, error -30
UBIFS error (pid 1052): make_reservation: cannot reserve 3774 bytes in jhead 2, error -30
UBIFS error (pid 1052): do_writepage: cannot write page 1 of inode 170, error -30
Or this… Also too late:
UBIFS error (pid 959): ubifs_iget: failed to read inode 1698, error -22
UBIFS error (pid 959): ubifs_lookup: dead directory entry 'S70wink', error -22
UBIFS error (pid 959): ubifs_read_node: bad node type (217 but expected 0)
UBIFS error (pid 959): ubifs_read_node: bad node at LEB 188:120952
UBIFS error (pid 959): ubifs_iget: failed to read inode 1687, error -22
UBIFS error (pid 959): ubifs_lookup: dead directory entry 'S80monit', error -22
UBIFS error (pid 959): ubifs_read_node: bad node type (220 but expected 2)
UBIFS error (pid 959): ubifs_read_node: bad node at LEB 169:41648
UBIFS error (pid 959): ubifs_read_node: bad node type (61 but expected 9)
UBIFS error (pid 959): ubifs_read_node: bad node at LEB 191:125184
UBIFS error (pid 959): ubifs_read_node: bad node type (62 but expected 1)
UBIFS error (pid 959): ubifs_read_node: bad node at LEB 188:8424
UBIFS error (pid 959): do_readpage: cannot read page 143 of inode 1647, error -22
UBIFS error (pid 959): ubifs_read_node: bad node type (15 but expected 1)
UBIFS error (pid 959): ubifs_read_node: bad node at LEB 188:8424
UBIFS error (pid 959): do_readpage: cannot read page 143 of inode 1647, error -22
It is also too late if you have seen this:
Starting lighttpd: OK
+ echo 'Launch upgrade script'
Launch upgrade script
+ /root/platform/run_upgrade.sh
+ FILE=/tmp/isalive
+ '[' '!' -e /tmp/isalive ']'
+ sleep 1
+ '[' '!' -e /tmp/isalive ']'
+ sleep 1
+ '[' '!' -e /tmp/isalive ']'
+ sleep 1
+ '[' '!' -e /tmp/isalive ']'
+ sleep 1
+ '[' '!' -e /tmp/isalive ']'
+ sleep 1
+ '[' '!' -e /tmp/isalive ']'